
Popular Linux Ditros

 64 Studio Ltd. produces bespoke GNU/Linux distributions which are compatible with official Debian and Ubuntu releases. Specialising in multimedia and digital content creation platforms which we develop for our OEM partners, we also offer support, documentation services and consultancy. Our software is already included in several shipping products in the professional audio market, with more to follow. In addition, we offer a free download product which has won critical acclaim for its stability and high performance.http://www.64studio.com/download
 Absolute is a x86 Linux distribution based upon Slackware. It concentrates on "desktop" use so that it is ready for internet, multimedia, document and general home use out of the box. Absolute is lightweight -- meaning 2 things: that it can run on on older hardware and that the OS interface stays out of your way. It is version-compatible with Slackware so you can use almost any package from the same version of Slack on Absolute. Development libraries (headers) for everything installed are always included, so you can code and/or build almost anything from source. It is what I use all day, every day, and I am very thankful for Linux and Slackware and I hope others find benefit from my work on Absolute.
http://www.absolutelinux.org/download.shtml

Arch Linux, a lightweight and flexible Linux® distribution that tries to Keep It Simple.
Currently we have official packages optimized for the i686 and x86-64 architectures. We complement our official package sets with a
community-operated package repository that grows in size and quality each and every day.
Our strong community is diverse and helpful, and we pride ourselves on the range of skillsets and uses for Arch that stem from it. Please check out our
forums and
mailing lists to get your feet wet. Also glance through our
wiki if you want to learn more about Arch.
AUSTRUMI (Austrum Latvijas Linukss) is a business card size (the current size is 93MB) bootable live CD Linux distribution. It is based on Slackware. The current official release of Austrumi Linux is 1.8.0. It requires limited system resources and can run on any Intel-compatible system with a CD-ROM installed.
http://cyti.latgola.lv/ruuni/

![[IMG]](https://lh3.googleusercontent.com/blogger_img_proxy/AEn0k_uzHSJmnDSd47HilWjNizMpQXWJPIgdiETjHm2leb9R3owBksBuuofbmxtbAIfJ5Wu0csPIoEzCY_dKk5jZkeAJqPVZgSOksbTk8F8Fdl7CwCbZ4cg=s0-d) AV Linux is a free custom shop modded and rodded 32bit computer Operating System designed to turn a regular old (or fairly new) PC or Intel Mac into an Audio/Graphics/Video workstation appliance. An appliance..? Yes, imagine your Workstation computer being as reliable as that old Frigidaire in the garage!
AV Linux is a free custom shop modded and rodded 32bit computer Operating System designed to turn a regular old (or fairly new) PC or Intel Mac into an Audio/Graphics/Video workstation appliance. An appliance..? Yes, imagine your Workstation computer being as reliable as that old Frigidaire in the garage!
AV Linux features a complete customized Debian Linux LXDE Desktop Environment with the added bonus of a handpicked selection of pre-tested and pre-configured Audio, Graphics and Video content creation software demonstrating the excellence of Open-Source and also includes many unique Commercial Demos. Great care has been taken to represent mature and productive applications many with custom builds to enhance their reliability and best show how far Linux has come as a Content Creation platform. A veritable treasure chest of Linux and Cross-Platform favourites are pre-installed, Ardour, Audacity, Blender, Cinelerra, Handbrake, Hydrogen, Kdenlive, LinuxDSP (demos), LMMS, Mixbus (demo), MuseScore, Openshot, Renoise (demo) and VLC Media Player are just the tip of the iceberg.
http://www.mymusicexchange.us/torrent/torrents-details.php?id=4

BackBox is a Linux distribution based on Ubuntu. It has been developed to perform penetration tests and security assessments. Designed to be fast, easy to use and provide a minimal yet complete desktop environment, thanks to its own software repositories, always being updated to the latest stable version of the most used and best known ethical hacking tools.
http://www.backbox.org/downloads
BackTrack is intended for all audiences from the most savvy security professionals to early newcomers to the information security field. BackTrack promotes a quick and easy way to find and update the largest database of security tools collection to-date. Our community of users range from skilled penetration testers in the information security field, government entities, information technology, security enthusiasts, and individuals new to the security community.
Feedback from all industries and skill levels allows us to truly develop a solution that is tailored towards everyone and far exceeds anything ever developed both commercially and freely available. The project is funded by Offensive Security. Whether you’re hacking wireless, exploiting servers, performing a web application assessment, learning, or social-engineering a client, BackTrack is the one-stop-shop for all of your security needs.
http://www.backtrack-linux.org/downloads/


The goal of Project Byzantium is to develop a communication system by which users can connect to each other and share information in the absence of convenient access to the Internet. This is done by setting up an
ad-hoc wireless mesh network that offers services which replace popular websites often used for this purpose, such as
Twitter and
IRC.
These services and web apps were selected because they are the ones most often used by activists around the world to find one another, exchange information, post media, and organize. They were also selected because they stand the best chance of being easy to use by our intended userbase, which are people using mobile devices like smartphones, MP3 players, and tablet PCs.
Unlike most mesh implementations, a Byzantium Mesh requires no specialized equipment that may not be easy to get during an emergency, just an x86 computer with at least one 802.11 a/b/g/n wireless interface. It will run on just about any x86 computer, including later generation Macbooks.
distribution created as a project of Digital Forensics
Currently the project manager is Nanni Bassetti.
CAINE offers a complete forensic environment that is organized to integrate existing software tools as software modules and to provide a friendly graphical interface.
The main design objectives that CAINE aims to guarantee are the following:
an interoperable environment that supports the digital investigator during the four phases of the digital investigation
a user friendly graphical interface
a semi-automated compilation of the final report
We recommend you to read the page on the CAINE policies carefully.
CAINE represents fully the spirit of the Open Source philosophy, because the project is completely open, everyone could take the legacy of the previous developer or project manager. The distro is open source, the Windows side (Wintaylor) is open source and, the last but not the least, the distro is installable, so giving the opportunity to rebuild it in a new brand version, so giving a long life to this project ....
CentOS is an Enterprise-class Linux Distribution derived from sources freely provided to the public by a prominent North American Enterprise Linux vendor. CentOS conforms fully with the upstream vendor's redistribution policy and aims to be 100% binary compatible. (CentOS mainly changes packages to remove upstream vendor branding and artwork.) CentOS is free.
CentOS is developed by a small but growing team of core developers. In turn the core developers are supported by an active user community including system administrators, network administrators, enterprise users, managers, core Linux contributors and Linux enthusiasts from around the world.
CentOS has numerous advantages over some of the other clone projects including: an active and growing user community, quickly rebuilt, tested, and QA'ed errata packages, an extensive mirror network, developers who are contactable and responsive, multiple free support avenues including IRC Chat, Mailing Lists, Forums, a dynamic FAQ.
This site makes use of Javascript. If your browser doesn't work with Javascript we recommend you use FireFox.
The Chakra Project brings a ground-up Linux distribution, a free software showcase project created by a bunch of people who like theKISS principles, the elegance of the Plasma Desktop and a special repository to support well known Gtk applications.
Chakra is currently under heavy and active development, it features a graphical installer, automatic hardware configuration, and of course some more tools and extras.
CrunchBang is a Debian GNU/Linux based distribution offering a great blend of speed, style and substance. Using the nimble Openbox window manager, it is highly customisable and provides a modern, full-featured GNU/Linux system without sacrificing performance.
The primary aim of the CrunchBang project is to produce a stable distribution offering the best possible out-of-the-box Openbox experience. To achieve this goal, CrunchBang pulls many base packages directly from Debian's repositories, which are well-known for providing stable and secure software. Packages from CrunchBang's own repositories are then customised and pinned to the system to produce what is known as the CrunchBang distro.
Dax OS is a lightweight distro, uses enlightenment as desktop and window manager, the resources consumed are minimal, 128 MB of RAM minimum and recommended 256-512 MB hard disk space 3GB, 5GB recommended.


Dreamlinux is a Brazilian distribution based on Debian GNU/Linux. A live CD with a graphical hard disk installation option, it boots directly into an Xfce or GNOME desktops which provide access to a good collection of desktop applications and a central control panel for system configuration.
Fedora is a
Linux-based operating system, a collection of software that makes your computer run. You can use Fedora in addition to, or instead of, other operating systems such as
Microsoft Windows™ or
Mac OS X™. The Fedora operating system is completely free of cost for you to enjoy and share.
The
Fedora Project is the name of a worldwide community of people who love, use, and build free software. We want to lead in the creation and spread of free code and content by working together as a community. Fedora is sponsored by
Red Hat, the world's most trusted provider of open source technology. Red Hat invests in Fedora to encourage collaboration and incubate innovative new
free software technologies.

 FreeBSD is an advanced computer operating system used to power modern servers, desktops and embeddedplatforms. A large community has continually developed it for more than thirty years. Its advanced networking, security and storage features have made FreeBSD the platform of choice for many of the busiest web sites and most pervasive embedded networking and storage devices.
http://www.freebsd.org/where.html

Frugalware is a general purpose linux distribution, designed for intermediate users (who are not afraid of text mode). We have a current and a stable branch. The current branch is updated daily, and we update our stable branch around every 6 months.
http://frugalware.org/download

gOS is an easy-to-use, Ubuntu-based distribution designed for less technical computer users. Its main features are the use of Enlightenment as the default desktop and tight integration of various Google products and services into the product.
http://distrowatch.com/table.php?distribution=gos
 KahelOS is the first and remains to be the only Filipino Linux Distro with the rolling release model on Arch Linux + GNOME. In the community, it is the first to release (non-beta) such Linux OS on Arch Linux + GNOME. KahelOS is not just an Operating System so to speak. IT is not just a Technology Product on a Linux and Open Source Platform added to the thousands of FREE Distros already available in the community. IT does not explicitly want to be different or to be set apart from the rest. However, among others, we simply would like Kahel OS (just like our team) to be the embodiment of our IT Values and Philosophy.
http://www.kahelos.org/#downloads
Knoppix is suitable even for Linux beginners and we encourage you to try it and use the extensive help on our site if you need it. If you would like to learn more about Knoppix, you could look at the
FAQs and Documentation, discuss it in the
Forum, or just try it out!
You can download for
free the latest version of the CD (700 MB) or DVD (4.14 GB). You can also save yourself the trouble of downloading this large file and it burning to disk by buying it for as little as $1.95 (worldwide shipping). Simply follow this link:
download / buy page. When you buy a disk we get a small commission that goes towards paying for and running this Knoppix.net site.
Knoppix.net is a resource for users, developers, and testers of Knoppix. The official website for Knoppix is on Klaus Knopper's website at knopper.net.
 live.linuX-gamers.net is a Linux live distribution: "boot 'n play". The idea is for you to be able to carry a decent amount of high-quality Linux games with you where ever you go for purposes of demonstration, gaming or parties. Your computer will remain completely unchanged as everything will run live.
http://live.linux-gamers.net/?s=download

The purpose of Linux Mint is to produce a modern, elegant and comfortable operating system which is both powerful and easy to use.
Started in 2006, Linux Mint is now the 4th most widely used home operating system behind Microsoft Windows, Apple Mac OS and Canonical's Ubuntu.
Some of the reasons for the success of Linux Mint are:
- It works out of the box, with full multimedia support and is extremely easy to use.
- It's both free of cost and open source.
- It's community-driven. Users are encouraged to send feedback to the project so that their ideas can be used to improve Linux Mint.
- Based on Debian and Ubuntu, it provides about 30,000 packages and one of the best software managers.
- It's safe and reliable. Thanks to a conservative approach to software updates, a unique Update Manager and the robustness of its Linux architecture, Linux Mint requires very little maintenance (no regressions, no antivirus, no anti-spyware...etc).
LinuxShark is based on opensuse 11.2 and The Linux Kernel Version 2.6.32.2, It is regularly updated with the latest security patches and Kernel upgrades. You are always safe.
LinuxShark has all the multimedia applications that make Linux fun to use for all !
Some of the applications are :
Mozilla FireFox
Mozilla Thunderbird
and more......

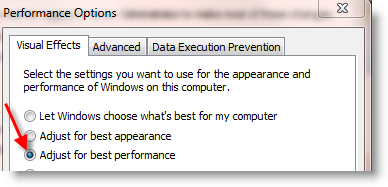
 Go to Advanced tab in next window, press change button under virtual memory.
Here you can see the current virtual memory size. Virtual memory called ‘paging file’ also.
In next screen under custom size enter size you want to allocate for virtual memory (paging file). It depends on your hard disk size and physical memory. Make sure it’s not less than system recommended size. Normally recommended paging file is 1.5 of physical RAM. In this example recommended size of virtual memory is 4605MB because my windows 7 RAM is 3GB. So, enter 4605MB in Initial size and Maximum Size fields.
Go to Advanced tab in next window, press change button under virtual memory.
Here you can see the current virtual memory size. Virtual memory called ‘paging file’ also.
In next screen under custom size enter size you want to allocate for virtual memory (paging file). It depends on your hard disk size and physical memory. Make sure it’s not less than system recommended size. Normally recommended paging file is 1.5 of physical RAM. In this example recommended size of virtual memory is 4605MB because my windows 7 RAM is 3GB. So, enter 4605MB in Initial size and Maximum Size fields. Press Set button, you may need to restart computer.


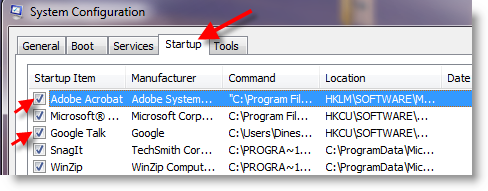
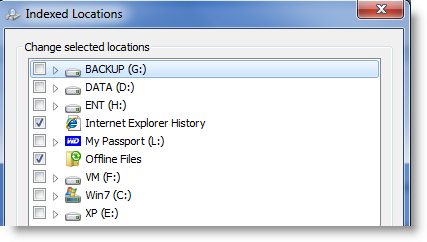 Also windows search service can be disabled in Computer Services. Go to Computer Management, Services and look for ‘Windows Search’. Set Disable to startup type and Click Apply.


